SSL certificates aren't just for online stores. More information sites are opting to secure their data by installing SSL/TLS certificates and migrating to https. Here are some of the benefits of encrypting your website:
- Encryption improves site visitor confidence in you and your content
- Your WordPress or other site logins are more secure
- Google loves https and will give you an SEO bump as a result
- Encrypting your site can actually make it run faster through http/2 protocol
Although CloudNovo offers low-cost SSL certificates for a year or more, we agree that securing your information should be easier and more accessible. For that reason, we have added an option to request a Let's Encrypt SSL certificate right from your Hepsia control panel on CloudNovo. Let's Encrypt is an open certificate authority that issues always-free SSL/TLS certificates renewable every 90 days. Do you need longer SSL/TLS certification? We've got Low-Cost SSL Certificates too.
How to Request Your Free Let's Encrypt SSL/TLS Certificate
To get a free SSL certificate from Let's Encrypt, just log into your CloudNovo.com control panel. From the main menu, select My Domains > Hosted Domains. Then click the gear icon to Edit Domain for the domain you want to encrypt.
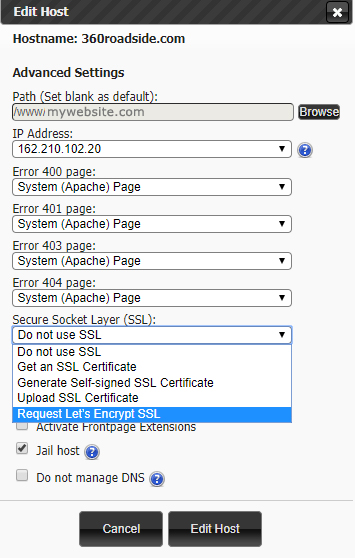
Then, just select "Request Let's Encrypt SSL" from the Secure Socket Layer (SSL) pull-down menu. It's that easy!
 In the IP address pull-down, please be sure to select either shared IP address for SSL or a dedicated IP if you have one with your plan or want to purchase a dedicated IP. You do not need a dedicated IP to have a valid SSL/TLS certificate for your website.
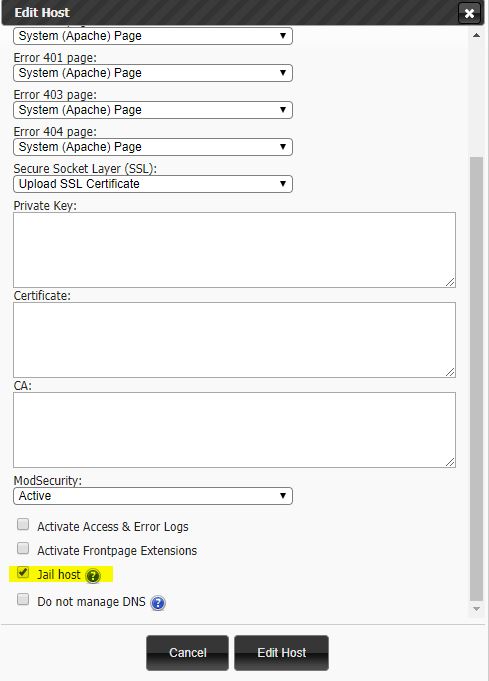
 If you registered your domain with another registrar, and you are not using CloudNovo's name servers, you will not be able to authenticate your site and request the Let's Encrypt SSL certificate through the control panel. However, you can authenticate your site and still obtain your Let's Encrypt SSL certificate through SSL For Free. Just follow the simple instructions on the SSL For Free site until you are given your codes for your Private Key, Certificate and CA Bundle. Then go back to your CloudNovo control panel My Domains > Hosted Domains, and click the gear icon to Edit Domain. But this time, select Upload SSL and copy/paste your codes where indicated. Don't forget to hit the Edit Host button when you're done.
Additional Security Tip: Jail Host Feature
If you choose a shared hosting plan or have more than one domain hosted on your plan, be sure to enable "Jail Host." This isolates one site from the others and provides a quarantine in the event that one of the other sites on the web server becomes infected with malware.
Good news: Now the Jail Host option is enabled by default for all newly created hosts to double protect them from intruders.
